 I’ve been blogging since 2006. Over the years, I’ve learned a thing or two about this writing activity, and I’ve created my own blogging system. Yes, I’ve also blogged a fair number of books, too, but it’s the daily blogging process that makes it all happen.
My clients often ask me about my blogging process. So I thought I’d share it with you. The system is not rocket science, but knowing the steps I take with each post might help you create a blogging system of your own that enables you to churn out posts consistently and produce some books as well.
Here are the six steps included in my blogging process.
1. Planning
I am a huge proponent of creating a blog plan. I encourage my clients to develop a three-month blog plan. It includes the title or subject of every post they will write during that quarter of the year.
If you write two posts a week, that means you have to brainstorm at least eight post ideas for each month and 24 for those three months. Once you’ve done this, you can start writing—and never wonder what to write about on a specific day.
Of course, you need to continue adding to the blog plan. When you finish month one’s posts, it’s time to add an entire new month’s worth of posts, so you always have a three-month plan. If you want to blog books, the posts that make up those manuscripts get planned and put on your schedule as well.
2. The Idea
It all starts with an idea. Sometimes, however, I don’t have one.
Since I tend to write posts with a self-help or how-to focus, when I need a new idea, I ask myself what my readers want to know or need to know. I also remind myself that if they knew what I know, they probably wouldn’t be reading my blog. So I try to recall the questions asked often by my client or consider what I wish I’d known earlier in my blogging and writing career.
If that fails, I look to other bloggers in my subject area. I check out their blogs to see what topics they’ve recently covered. This usually spurs a new idea or gives me clarity on how I can write about the same or a similar topic but in my own way.
All my ideas go into my blog plan. I know what posts I must write and which ones will be written and submitted by guest bloggers.
3. The Blog Post
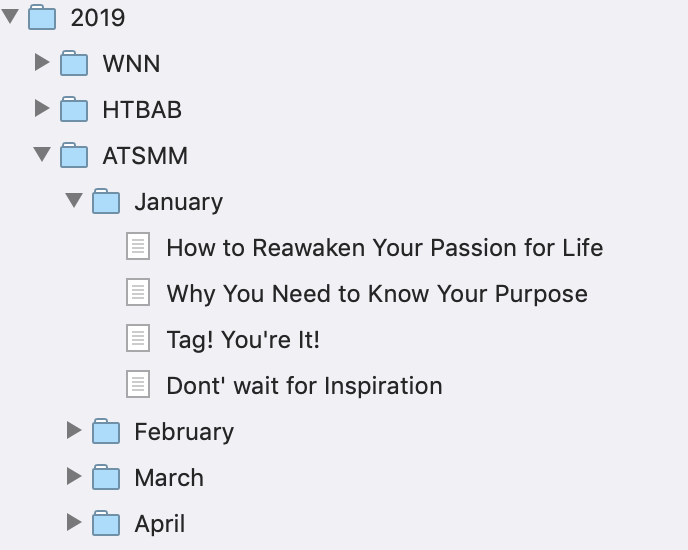
Typically, I plan out a blog post with an extremely basic outline. I open up Scrivener and start a new post in the “project” called “Blog Plan.” (The blog plan contains folders for each of my blogs. I create and compose posts in documents filed by month.)

I give the document a title, which may or may not change. I then create between three and five subtitles. These represent the main points I want to make in the post.
Now it’s then to write! I start with the introductory paragraph. With that done, I write from point to point or subheading to subheading.
I finish with a conclusion (one or two paragraphs) that ties the beginning of the post to the end. And I compose a question for the reader that asks them to reply in a comment.
4. Blog Post Editing
With the post written, I follow a systematic approach to completing the piece and getting it scheduled for publication on my blog. This starts with editing.
I typically edit each post once in Scrivener. If it’s a guest post, I edit in Word initially, since my guest bloggers turn in their work in Word.
As I edit in Word, I format subheadings as well as bold, italic, bulleted, and numbered type. When writing and editing in Scrivener, I use MultiMarkdown language to accomplish these tasks.
I then copy and paste Scrivener documents into Grammarly. Word docs are imported to keep all formatting. I reread the entire post looking for any revisions I want to make. Along the way, I also address the Grammarly suggestions.
When done with Grammarly, I export the Word doc; once again this ensures the document retains formatting. Or I copy the document out of Grammarly and paste it back into Scrivener.
After pasting the edited version in Scrivener, I compile the document. When I compile the document I use the multimarkdown—>web page setting, which produces a post ready to be pasted into WordPress—all the formatting is done. (Clicking to open the compiled file opens it in my web browser as a web page.)
5. Finishing Touches
With the blog post written and edited—and mostly formatted, I copy and paste into WordPress. If I was using a Word doc, I copy the entire document. If I started with Scrivener, I copy the web page from the browser and then paste into WordPress.
I then choose pull quotes and create them using the Click to Tweet plugin.
Additionally, I open Canva.com and create a quote card. Typically, I write the quote rather than using a pull quote. I may choose artwork available from Canva (even if I have to pay), or I find photos or images on Pixabay.com, Unsplash.com or paid sites like 123RF.com or Shutterstock.com.
The quote card gets dropped into the very beginning of the post. I then use a featured image plugin to ensure that specific image shows in the thumbnails produced when visitors see a series of my most recent posts featured on the site.
I religiously use the SEO by Yoast plugin as one of my last steps. With this tool I check my SEO, write a descriptive snippet, choose a keyword, and make sure everything about the posts makes it search-engine friendly. Additionally, I make sure I’ve chosen the quote card to show on social media sites.
Then, I choose a few tags and place the post in a category. And I schedule the post for the day and time when I want it to publish.
6. The Post Preview
My final step involves previewing the post. I will read the post one last time and check that everything looks as it should. I’ll tweak or rewrite as necessary.
It’s amazing what you might see in the preview mode that you didn’t notice in the posts original form or even in WordPress. Viewed as a published post in your browser, you’ll catch all sorts of small errors. Sometimes I preview numerous times before all errors are fixed.
How Long Does it Take?
This may seem like an enormously lengthy process, but it’s not…or it won’t be once you get the hang of it.
I can write a 750 to 1,000-word blog post in under an hour. It takes me about 30 to 60 minutes to revise, edit, and complete the SEO and formatting (if any is necessary). What often slows me down is creating the quote card; it can take forever to find the right image. On a good day, however, I’m in and out of Canva and have uploaded my quote card in about 15 minutes.
So, I’d say it takes me between two and two and a half hours to complete a post. Yet, there are days when I complete the process in less than two hours…or in more than two hours. How long it takes you will depend in large part on how quickly you can write your post and create artwork.
Give my process a try—or create your own. But do create a system of some sort. It will help you produce posts more effectively. And that’s important if you want to write and publish posts consistently. If you need some help creating a blogging process of your own, blogging your book, or creating a blog plan, click here.
Do you have a blogging process? Tell me about it in a comment below.
Image by Gerd Altmann | Pixabay

Ev?ry weekend ? used t? ?o to ?ee thiis web site, aas
i ?ant enjoyment, as this t?is website conations truly pleasant funny materil
t??.
Allso visit m? web site: Vacation